Low-Latency Live Streaming your Desktop using ffmpeg
I recently bought myself a projector, which I installed in one corner of the room. Unfortunately I didn’t buy a long enough HDMI cable with it, so I could not connect it to my desktop computer and instead used my loyal ThinkPad T60 for playback. But I also wanted to be able to play some games using the projector, for which my laptop wasn’t beefy enough. So I thought, why not just stream the games from my desktop computer to the laptop?
In this post I will explore how to stream 720p (or any quality for that matter) from one computer to another using ffmpeg and netcat, with a latency below 100ms, which is good enough for many games. TL;DR; If you don’t care about the technical details, just jump to the end of the post to try it out yourself.
The problem:
Streaming low-latency live content is quite hard, because most video codecs are designed to achieve the best compression and not best latency. This makes sense, because most movies are encoded once and decoded often, so it is a good trade-off to use more time for the encoding than the decoding.
One way to save space or bandwidth is to compress different parts of a movie with varying quality. For example, the h264 encoder will compress fast moving scenes more than a slow scene, because the human eye will not be able to see all the detail in the fast moving scene anyway, while the viewer might inspect the image of a slow scene more thoroughly. But to do so, the encoder has first to find out if it is currently encoding a fast- or slow-moving scene.
There are essentially two ways to find out if the content is fast- or slow-moving: The most commonly used method for non-live content is a so called two-pass encoding, in which the encoder first analyses the whole movie and then, in a second pass, encodes the movie using the information acquired before. Unfortunately this is not possible for live content. The second way to do this is to look ahead for a few frames in the movie material and then to decide adaptively whether this is a slow or a fast scene. Since it is not possible to look ahead in live material, the encoder has to buffer some frames before encoding them, so it can know what’s coming up next. This buffer however introduces latency in the ballpark of seconds rather than milliseconds, which makes it impossible to create an interactive live-stream using this technique. This also is a simplified example, since modern encoders can use multiple reference frames if the past and future of the current frame to reduce the redundancy of image data. These frames are called GOP (group of pictures) and those will play a significant role to get to a sub-second latency stream.
Because a low-latency live stream cannot afford the time to analyse the video material up front, live streamed content will always look worse than any other encoded content, and this can only be countered by using more bandwidth.
I found some blog posts that explain live-streaming in depth and most of them used the mpeg2video encoder, but most of them “only” wanted real-time encoding, but not necessarily low-latency. I achieved quite good results using mpeg2video, with the lowest latency of all the codecs I tried out, but also wanted to explore if I could achieve better image quality. So I tried out the x264 encoder using the “zerolatency” tuning. While the “zerolatency” tuning did help, I still had a huge latency, far from playing any game on a live stream. So I did a little digging and found a thread on the x264dev forums, which I resurrected from the internet archive, in which a lot of additional x264 flags are discussed. The most important one to bring down the latency was to use the smallest possible vbv-bufsize (which is the encoder buffer). Another good advice is to use so called intra-refresh, which means that there aren’t any full key frames anymore, but instead contents of a key frame are transmitted in blocks over time. This means that there is not a burst of data to send for each key frame, but instead parts of the image are refreshed over time. To figure out if some option would improve the latency or not I needed a way to measure it.
I wrote a quick script in python that would output the current time in milliseconds to measure the latency:
#!/usr/bin/python3
import time
import sys
while True:
    time.sleep(0.001)
    print('%s\r' % (int(time.time() * 1000) % 10000), end='')
    sys.stdout.flush()
Using this script, I would then encode and decode the stream on my desktop at the same time. Making a screenshot of both the original desktop and the streamed desktop next to it gives me the total system latency.
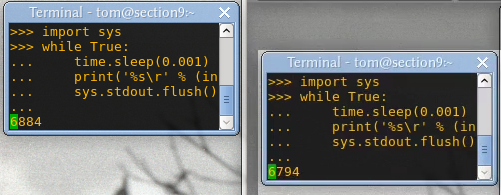 On the the real desktop the time is at 6884, and on the right the streamed desktop it is at 6794. In this example the stream has a latency of about 90ms
In this way I could measure if any changes I made really improved the latency of my video stream without the network overhead. This would not always be totally accurate, as ffmpeg might take a snapshot of the desktop just before a new image is rendered by the Xwindow system, but should not be too far off.
Using this measurement tool, I made a lot of changes to the encoder options, but at some point I hit a brick wall. I couldn’t get the latency down any further: The client side was buffering the stream as well! I used mplayer to playback my video stream and tried out all kinds of flags like -nocache and -framedrop. While all of them helped a bit, mplayer performed best when using the -benchmark flag… Which seems to bypass anything that is not part of the actual video decoding process, which is exactly what was needed.
After figuring out good settings for the encoder and decoder, I also tried out other transport streams like RTP, but mpegts was the faster in my tests. I guess it would be possible to achieve even better latency using ffmpegs UDP stream instead sending the stream over TCP using netcat, but the UDP stream would break down after a few seconds, even on the local loopback, throwing around cryptic error messages about circular buffers…
The solution:
=============
Using h264 (okay latency, better image quality, low bandwidth, high cpu usage)
The examples given here require at least 3000kbits/s or 3Mbit/s bandwidth.
On the host:
ffmpeg \
    -f x11grab -s 1280x720 -framerate 30 -i :0.0 \
    -c:v libx264 -preset veryfast -tune zerolatency -pix_fmt yuv444p \
    -x264opts crf=20:vbv-maxrate=3000:vbv-bufsize=100:intra-refresh=1:slice-max-size=1500:keyint=30:ref=1 \
    -f mpegts - | nc -l -p 9000
For further x264 options check out this guide. If you want to change them for your scenario, you always have to make sure that your
vbv-bufsize = vbv-maxrate / framerate
so in this scenario, for 3000 vbv-maxrate, I chose a vbv-bufsize of 100 at 30 FPS.
On the client:
nc <host_ip_address> 9000 | mplayer -benchmark -
Note: always use the -benchmark flag on the client-side. -framedrop might help as well, especially on slower clients.
Using mpeg2video (lowest latency, low image quality, high bandwidth, lower cpu usage)
————————————————————————————-
Using mpeg2video, I could achieve almost no noticable latency, but the bandwidth requirements go through the roof, so this is only an option when you have either very fast WiFi or a LAN.
On the host, using about 16Mbit/s:
ffmpeg \
    -f x11grab -s 1280x720 -framerate 30 -i :0.0    \
    -c:v mpeg2video -q:v 20 -pix_fmt yuv420p -g 1 -threads 2 \
    -f mpegts - | nc -l -p 9000
Increasing the -q:v setting will lower the quality and save some bandwidth and vice versa, setting it to a lower value will increase quality and bandwidth. Setting the quality to 2 gives a perfect image, but uses something around 150Mbit/s!
The client is the same as above in the x264 example.
Extra tips:
If you have the spare network bandwidth and CPU time, you can double the frame rate to 60 and you’ll get another latency drop. Using mpeg2video and 60 FPS I achieved essentially zero latency on the local loopback device, so all that is left is network latency. Also, you can try out the ultrafast setting of x264, but this only made the image look worse while not helping too much with the performance.
If you want to try to tweak this setup even further, you can pipe the host directly into the client instead of using the network, using the -quiet option of mplayer to see what the encoder is up to.
All for nothing
After all those tweaks, tests and setting everything up, streaming my desktop in 720p over WiFi to my laptop works very well. Unfortunately the input lag of the projector is extremely high in the “normal” mode and the so called “fast” mode or “gaming” mode cannot be turned on when using VGA as signal input. So I’ll have to wait until the HDMI cable arrives… bummer.