Homeserver Upgrade: Odroid XU3-Lite Setup on a SD-Card
I recently bought a new home server, the Odroid XU3-Lite to replace my poor man’s home server I called the thin-server, to run CherryMusic and the like.

That little ARM machine is a beast in the size of a cigarette pack, featuring a total of eight CPU cores, an ethernet port and most importantly an USB 3.0 port to connect an external hard drive. It also comes with a plastic case, with a small fan inside and a PSU that is strong enough to power external hard drives connected to the USB ports. I ordered the smaller “Lite” version, which has a slightly lower CPU clock rate, but costs a lot less than its bigger brother.
In this post I’ll guide you quickly through the installation process of the ubuntu image on a micro SD-Card, how to make use of all the space on the microSD card and how to secure this little fellow a little after the installation of the image.
Installing the Operating System Image
Download the latest Linux image from their site and unpack it using xz:
$ xz --decompress IMAGE_FILE.img.xz
The actual image file will of course be called something like ubuntu-14.04.1lts-lubuntu-odroid-xu3-20150212.img.xz and not IMAGE_FILE.img.xz.
Then plug in the SD Card into you linux computer and check out were it was mounted using dmesg.
$ dmesg | tail
... some other output ...
[ 6060.833668] sd 8:0:0:1: [sdX] Attached SCSI removable disk
[ 6077.944503] sd 8:0:0:1: [sdX] 60874752 512-byte logical blocks: (31.1 GB/29.0 GiB)
You will see something like sdb or sdc in the output, make sure that you got the letter right; I will use sdX as a placeholder. As you can see I bought a 32 GB SD Card so I would never have to worry what I install on the machine, because there will be more than enough room for it. Also make sure you’re buying a quality SD-Card with fast write rates for better performance.
Now you can copy the image onto the SD-Card.
Warning: All the data on the SD-Card will be lost forever in this process so make sure this SD-Card does not contain any bitcoins or wedding photos you might miss later!
dd if=IMAGE_FILE.img of=/dev/sdX bs=128k
Depending on your SD-Card this process may take some minutes and dd will not give you any indication of the progress so be patient.
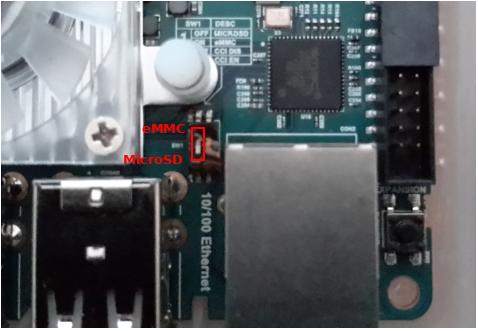
Before you can actually boot from the microSD card, make sure the correct boot mode is set. The ODROID XU3-Lite can either boot from a microSD card or from a eMMC module. There is a tiny switch on the board, to set the the boot mode as explained in the ODROID wiki, which I found a bit confusing to be honest. Set the switch as shown in the picture below.
Now you can insert the microSD card and plug it is and it should boot up in about 20 seconds, and automatically connect to your network using DHCP.
Now you can login your new system using SSH from your linux computer (in my case it had the IP 192.168.1.87, but you might need to login to your router to find out what IP the ODROID received):
ssh root@192.168.1.87
As always with new SSH connections:
Are you sure you want to continue connecting (yes/no)?
Enter “yes” to proceed. The default password is odroid
First, let’s check how much space I have left on the SD card.
root@odroid:~# df -h
Filesystem      Size  Used Avail Use% Mounted on
/dev/mmcblk0p2  4.9G  4.4G  313M  94% /
none            4.0K     0  4.0K   0% /sys/fs/cgroup
udev            747M  4.0K  747M   1% /dev
tmpfs           998M  4.0K  998M   1% /tmp
tmpfs           200M  2.6M  197M   2% /run
none            5.0M     0  5.0M   0% /run/lock
none            998M   72K  998M   1% /run/shm
none            100M   20K  100M   1% /run/user
/dev/mmcblk0p1  129M  5.1M  124M   4% /media/boot
Only some hundred megabytes? Well, thats because the image I flashed onto the SD card also contains the partition layout and the contained file systems, which is as small as possible, so people can use this image also on smaller SD cards. So let’s change that.
First off, partitions are not the same as file systems! So we need to resize the partitions to match the SD card first, and then resize the filesystem to match the partitions.
Resize the partitions
Since the image was about 6 GB in size, but I bought a 32 GB micro SD card there is a lot of space to be gained. Doing this on a live system is far from a good idea, but since this is the stock system, I don’t care; There’s no data to be lost. Never do this on a system with data you (or somebody else) care about.
root@odroid:~# fdisk -l

Disk /dev/mmcblk0: 31.2 GB, 31167873024 bytes
4 heads, 16 sectors/track, 951168 cylinders, total 60874752 sectors
Units = sectors of 1 * 512 = 512 bytes
Sector size (logical/physical): 512 bytes / 512 bytes
I/O size (minimum/optimal): 512 bytes / 512 bytes
Disk identifier: 0x000c4046

Device Boot              Start         End      Blocks   Id  System
/dev/mmcblk0p1            3072      266239      131584    6  FAT16
/dev/mmcblk0p2          266240    10915839     5324800   83  Linux
So we’ve got 2 partitions here. The first one (/dev/mmcblk0p1) contains the bootloader and the second one contains our ubuntu linux system. By the way: If you ever wondered, mmcblk0p1 stands for Multi Media Card Block Device 0 Part 1. Makes it a bit easier to remember. Let’s write down the total size of the SD card in cylinders somewhere.
So let’s fire up parted to and first check the partition numbers using print.
root@odroid:~# parted /dev/mmcblk0
GNU Parted 2.3
Using /dev/mmcblk0
Welcome to GNU Parted! Type 'help' to view a list of commands.
(parted) print
Model: SD SD32G (sd/mmc)
Disk /dev/mmcblk0: 31.2GB
Sector size (logical/physical): 512B/512B
Partition Table: msdos
Number  Start   End     Size    Type     File system  Flags
 1      1573kB  136MB   135MB   primary  fat16
 2      136MB   5589MB  5453MB  primary  ext4
Then we set the unit used by parted to cyl, so when we resize, we can enter the number of total cylinders of the card we wrote down earlier when using fdisk.
(parted) unit cyl
Now we can resize the partition 2 (which contains the ext4 filesystem) to use all the available space:
(parted) resizepart 2
Warning: Partition /dev/mmcblk0p2 is being used. Are you sure you want to continue?
Yes/No? yes
End?  [170559cyl]? 951168
(parted) quit
Alright, so now the partition ends at the end of the SD card.
Resize the file system
Now we can resize the filesystem to the size of the enlarged partition using resize2fs:
resize2fs /dev/mmcblk0p2
resize2fs 1.42.9 (4-Feb-2014)
Filesystem at /dev/mmcblk0p2 is mounted on /; on-line resizing required
old_desc_blocks = 1, new_desc_blocks = 2
The filesystem on /dev/mmcblk0p2 is now 7576064 blocks long.
So let’s check the space again:
root@odroid:~# df -h
Filesystem      Size  Used Avail Use% Mounted on
/dev/mmcblk0p2   29G  4.4G   24G  16% /
Bam. Now with so much space available, lets fill it with pictures of squirrels. Sometimes I’m overwhelmed by the sheer awesomeness of linux.
Create local user and Disable root user login:
As seen before, your home server can be easily accessed using the default root login, which is not so nice. So lets add another user to login with and also make sure nobody can ssh into the server using the root user.
First add a new user and put that user into the sudo group, so this user can issue all kinds of system commands.
$ adduser USERNAME
$ usermod -a -G sudo USERNAME
Now, before we block ssh access for the root user, make sure you can login to the server and execute sudo using the newly created user, or you have locked yourself out of the system!
Now edit /etc/ssh/sshd_config to disable the root login, using any command line text editor (I’m using nano in this case):
$ sudo nano /etc/ssh/sshd_config
And now set PermitRootLogin to No:
PermitRootLogin no
Once you have saved the file, you can restart the ssh server to make the changes take effect.
$ sudo service ssh restart
That’s it, happy hacking!