How to add USB Gamepad support for your Android phone or tablet
IMG_20150411_201153
I was almost at the point to buy a playstation or xbox controller to use with my tablet, since they seem to be supported out-of-the-box. But actually I still have an old USB controller lying around, which would be more than good enough for playing some games. Interestingly my gamepad did in fact work partly, but only the left analog stick and one or two buttons, and the rest did not. My hacker spirit told me that this must be fixable somehow.
So I started hacking around and added support for my old USB gamepad for my android tablet. In this post, I’ll show you how I did it and how you can to add support for any gamepad to your phone or tablet as well!
First of, your tablet or phone needs to be rooted to make the changes needed to support your gamepad. But just about any device is rootable by now, so a quick search will tell you how to root it, if you haven’t done that already.
Prequisites:
- rooted android device
- USB-OTG cable (to connect the gamepad)
- ADB
- A linux computer
- evtest (utility program to read raw gamepad input)
Make sure to install evtest and the android debug bridge (adb), which should be available for most linux distributions.
I recommend using ADB wireless to connect to your device, so you can transfer files and type in shell commands while the gamepad is plugged in. I personnally use the open source ADB Manager for that purpose.
And by the way: I am not responsible if you break anything, bla bla. Changing stuff on your android device might as will break it, so proceed with caution. Also, the commands in this how-to are specific to my tablet and gamepad and you have to change them accordingly to your device and hardware.
Finding the keycodes
Android maps all gamepad keys to some internal actions. For example some gamepad key with the number 289 is mapped to the action BUTTON_X for some specific keyboard, gamepad or hair-dryer. Here’s the documentation of the keymap files, which will tell you a lot about how those are composed. Those keylayouts are inside /system/usr/keylayout/ on your android device. So all we need to do to make your gamepad compatible with android, is to create a keylayout that tells android what keys of the gamepad mean which action inside android. That means we have find the keycode and axis ids of all the buttons and map them to the android actions.
First plug in your gamepad into your linux computer. After doing so, run dmesg in a terminal to find out the vendor and product id of your gamepad. This will be important later.
$ dmesg
usb 3-1: new low-speed USB device number 10 using xhci_hcd
usb 3-1: ep 0x81 - rounding interval to 64 microframes, ep desc says 80 microframes
input: Mega World USB Game Controllers as /devices/pci0000:00/0000:00:14.0/usb3/3-1/3-1:1.0/0003:07B5:0315.0008/input/input24
hid-generic 0003:07B5:0315.0008: input,hidraw3: USB HID v1.10 Joystick [Mega World USB Game Controllers] on usb-0000:00:14.0-1/input0
In this output, the important part is 07B5:0315, which are the vendor ID 07B5 and the product ID 0315. Your output might look different depending on your kernel version. If you can’t figure out what’s what, you can also run lsusb to get a more readable output.
$ lsusb
Bus 003 Device 005: ID 8087:07dc Intel Corp.
Bus 003 Device 010: ID 07b5:0315 Mega World International, Ltd
Bus 003 Device 001: ID 1d6b:0002 Linux Foundation 2.0 root hub
To find out the key codes you will have to install and use the program evtest
To get the raw keycodes, we have to read the signals directly from /dev/input. As there are many devices inside /dev/input, you will have to try out which device is actually your gamepad. Normally it will be the last event device, in my case thats /dev/input/event18.
$ evtest /dev/input/event18
Now press some buttons to find out which button has which key code. Pressing a button will yield some output like that:
Event: time 1428772902.008207, type 4 (EV_MSC), code 4 (MSC_SCAN), value 90001
Event: time 1428772902.008207, type 1 (EV_KEY), code 288 (BTN_TRIGGER), value 1
Event: time 1428772902.008207, -------------- EV_SYN ------------
Event: time 1428772902.120190, type 4 (EV_MSC), code 4 (MSC_SCAN), value 90001
Event: time 1428772902.120190, type 1 (EV_KEY), code 288 (BTN_TRIGGER), value 0
Event: time 1428772902.120190, -------------- EV_SYN ------------
Write down the keycode for that button, in the case above thats 288 for the A-Button, so we can later put it inside the android configuration. For me the following configuration came out. I wrote down all the Buttons that are mapped to something in android.
Also wiggle the analog sticks first horizontally then vertically to find out the axis of each stick. In my case those where axis 0/1 for X/Y left and 2/5 for X/Y right. Using the documentation from the android website and by looking at the other keylayout files on my tablet, I created a configuration file like this:
#
# Mega World USB Game Controllers
#
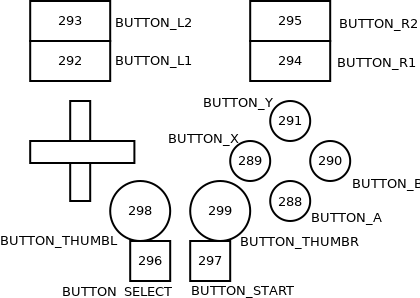
key 288 BUTTON_A
key 290 BUTTON_B
key 289 BUTTON_X
key 291 BUTTON_Y
key 292 BUTTON_L1
key 294 BUTTON_R1
key 293 BUTTON_L2
key 295 BUTTON_R2
key 296 BUTTON_SELECT
key 297 BUTTON_START
key 298 BUTTON_THUMBL
key 299 BUTTON_THUMBR
# Left and right stick.
axis 0x00 X
axis 0x01 Y
axis 0x02 RZ
axis 0x05 Z
Before you put that configuration file on your device you can optionally use the validate keymaps tool from the android sdk to make sure you didn’t make any mistakes creating the configuration.
The configuration should now be saved to a file that includes the vendor ID and product ID of your gamepad. In my case the vendor ID is 07B5 and the product ID is 0315 so the name my configuration file is Vendor_07b5_Product_0315.kl
Android uses the file name to make sure to only load specific configurations for specific USB devices, so make sure those are correct.
Adding the configuration to your device
After saving the key mapping to Vendor_07b5_Product_0315.kl, we need to upload the file back onto the device. We’ll use adb for that. As described earlier, I recommend using ABD wireless so it’s easier to make changes to the configuration while the gamepad is plugged in.
We put the configuration on the sdcard and move it afterwards to the correct position on the device, because we don’t have root access over adb (so we can’t move the configuration directly into the appropriate system folder)
$ adb connect
$ adb push Vendor_07b5_Product_0315.kl /sdcard/
Before you can move the file to the correct location you must remount the /system partition, to make it writable. This may differ from device to device. Check where your /system is mounted using the mount command before. In my case /system is mounted to /dev/block/mmcblk0p20, so I remount that device read-write-able.
Also make sure to allow the adb shell to become root on your tablet once you have entered the su command.
$ adb shell
$ su
$ mount -o remount,rw /dev/block/mmcblk0p20
Now we can copy the key layout from the sdcard into the keylayout folder:
$ cp /sdcard/Vendor_07b5_Product_0315.kl /system/usr/keylayout/
And really important, you have to change the permissions of the file to 644 or android will not load it after the gamepad was plugged in!
$ chmod 644 /system/usr/keylayout/Vendor_07b5_Product_0315.kl
Now you can connect your gamepad to the android device and play some games to check if everything worked out. If something went wrong, you can always upload a new version of you keymap to the sdcard, move it to the system folder, change the permissions and replug your gamepad to make more tests.
Once you have tested that everything works, make sure to remount the /system partition back to read-only.
$ mount -o remount,ro /dev/block/mmcblk0p20
And now I can finally play GTA: San Andreas on my tablet using my really old cheapo USB Gamepad, which is incredibly better than the touch controls. Great.